Laravel Livewire DataTable with Bootstrap 5

I'm a self-taught web developer who likes sharing my knowledge, helping people.
DataTables are a great feature to display data to the user. This data can be filtered, organize, or exported if you want. In this tutorial, we are going to learn how to integrate dataTables in Laravel Livewire with Bootstrap 5.
Table of contents
- Create new Laravel project
- Set up database credentials
- Configure Auth with Bootstrap 5 & Livewire
- Configure model Director and Movie
- Configure Movie Controller
- Defining routes
- Configure Movies views
- DataTable
- Github Repo
1. Create new Laravel Project
To create a new project execute this command in your console.
composer create-project laravel/laravel laravel-livewire-datatable
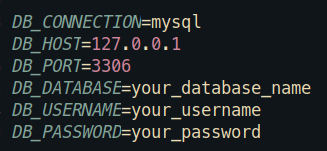
2. Set up database creedentials.
Open your .env and edit it.
3. Configure Auth with Boostrap 5 & Livewire
In this step, we need to install a package that is a starter kit with Livewire & Bootstrap 5 auth scaffolding. For that, in the terminal run this command.
composer require bastinald/laravel-livewire-auth
To generate the scaffolding run
php artisan make:auth
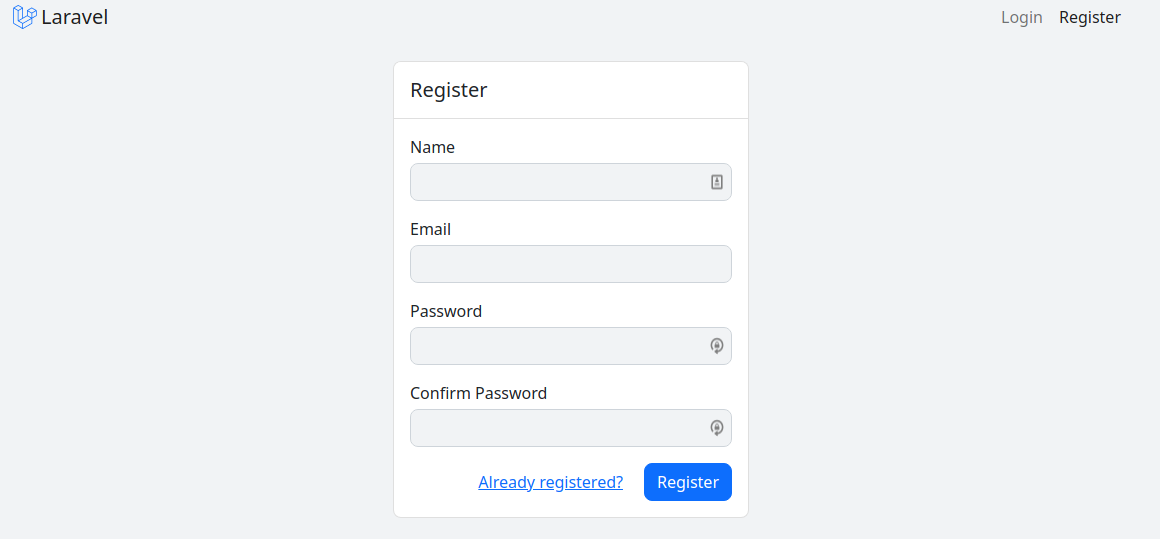
Very cool!!!. Now we can access to register and login page also we don't have to configure Laravel Livewire or Bootstrap 5 it already comes ready to use. How cool is that!!!.
Your register page looks like
Note: If you have any trouble with this package execute php artisan migrate:fresh
4. Configure model Director and Movie
In this case, I'm going to create a small database about movies with a relationship to directors to show you how you can integrate this kind of thing into the datatable.
Let's begin. In the terminal execute
php artisan make:model Director -mf
php artisan make:model Movie -mf
Cool!!!. we have two models with their migrations and factories. The next step is to open the director migration file, located in database/migrations and add this code.
  public function up()
    {
        Schema::create('directors', function (Blueprint $table) {
            $table->id();
            $table->string('name');
            $table->timestamps();
        });
    }
We keep this tutorial simple that's why I only add the name, now we can go to movies migration and edit it like this.
    public function up()
    {
        Schema::create('movies', function (Blueprint $table) {
            $table->id();
            $table->string('title');
            $table->string('description');
            $table->unsignedInteger('year_release');
            $table->foreignId('director_id')->nullable()->constrained();
            $table->timestamps();
        });
    }
Once the migrations are ready, we can go to app/Models/Director.php and add the fillable and relationship
 protected $fillable = ['name'];

    public function movies()
    {
        return $this->hasMany(Movie::class);
    }
The same step is for app/Models/Movie.php file
 protected $fillable = [
        'title',
        'description',
        'year_release',
        'director_id'
    ];

    public function director()
    {
        return $this->belongsTo(Director::class);
    }
Let's go to the factories in database/factories, open the director factory, and add
public function definition()
    {
        return [
            'name' => $this->faker->name()
        ];
    }
And now we have to configure the movies factory
 public function definition()
    {
        return [
            'title' => $this->faker->word(),
            'description' => $this->faker->sentence(),
            'year_release' => $this->faker->year(),
            'director_id' => rand(1, 5)
        ];
    }
The final step is go to database/seeders/DatabaseSeeder.php and put this code
 public function run()
    {
        Director::factory(5)->create();
        Movie::factory(25)->create();
    }
Note: You have to put it in this order because if you put the Movie Factory before you will receive an error.
Execute this command.
php artisan migrate:fresh --seed
Alright. Our data is ready to test in our datatable.
5. Configure Movie Controller
Create a new movie controller with this command
php artisan make:controller MovieController --resource --model=Movie
Let's go to the new controller in add this code
public function index()
    {
        return view('movies.index');
    }

public function edit(Movie $movie)
    {
        $movie->load('director');

        return view('movies.edit', compact('movie'));
    }
Note: In this article I only will use index and edit methods but I created a resource controller in case you want to complete a CRUD with the datatable.
6. Defining routes.
We have to search the routes/web.php and the controller.
Route::resource('movies', MovieController::class);
If you want to check the routes, you can execute in the terminal php artisan route:list
7. Configure Movies views
Let's go to resources/views and create a new folder called movies inside this new folder create 3 new files like this.
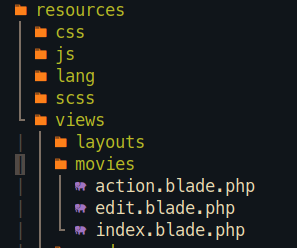
When you finish creating these files, open the index.blade.php and this code
@extends('layouts.app')

@section('content')
<div class="row justify-content-center">
    <div class="col-lg-12">
        <div class="card">
            <h5 class="card-header">
                @yield('title', 'Movies')
            </h5>
            <div class="card-body">
                <!-- The DataTable will be here -->
            </div>
        </div>
    </div>
</div>
@endsection
In the resources/movies/edit.blade.php put this code
@extends('layouts.app')

@section('content')
<div class="row justify-content-center">
    <div class="col-lg-12">
        <div class="card">
            <h5 class="card-header">
                @yield('title', 'Movies')
            </h5>
            <div class="card-body">
                Edit movie
            </div>
        </div>
    </div>
</div>
@endsection
The final view to edit is action.blade.php put this code
<a href="{{route('movies.edit', $row->id)}}" class="btn btn-success">Edit</button>
Everything is ready we can proceed to install and configure the datatable.
8. DataTable.
Finally, we are here. Let's go.
8.1 Install DataTable
Run this command
composer require rappasoft/laravel-livewire-tables
8.2 Configure DataTable
we need to publish the assets
php artisan vendor:publish --provider="Rappasoft\LaravelLivewireTables\LaravelLivewireTablesServiceProvider" --tag=livewire-tables-config

php artisan vendor:publish --provider="Rappasoft\LaravelLivewireTables\LaravelLivewireTablesServiceProvider" --tag=livewire-tables-views

php artisan vendor:publish --provider="Rappasoft\LaravelLivewireTables\LaravelLivewireTablesServiceProvider" --tag=livewire-tables-translations
The next is to go to config/livewire-tables.php file and change the default theme for bootstrap 5, like this.
<?php

return [
    /**
     * Options: tailwind | bootstrap-4 | bootstrap-5.
     */
    'theme' => 'bootstrap-5',
];
8.3 Create and Display Basic DataTable.
In the terminal execute this command.
php artisan make:datatable MovieTable Movie
This command will create a DataTable located in app/Http/Livewire/MovieTable.php, open this file and you should see this
<?php

namespace App\Http\Livewire;

use Illuminate\Database\Eloquent\Builder;
use Rappasoft\LaravelLivewireTables\DataTableComponent;
use Rappasoft\LaravelLivewireTables\Views\Column;
use App\Models\Movie;

class MovieTable extends DataTableComponent
{

    public function columns(): array
    {
        return [
            Column::make('Column Name'),
        ];
    }

    public function query(): Builder
    {
        return Movie::query();
    }
}
Let's change some stuff here. In the columns function edit it like this.
 public function columns(): array
    {
        return [
            Column::make('Title')
            Column::make('Description'),
            Column::make('Year Release', 'year_release')
        ];
    }
Note: Column::make() receive two parameters, the first parameter is the name of the column header also the parameter will try to match your field in the database, for example: 'Title' => 'title'. The second receive the name of the field in your database or the relationship you want to display. This parameter is optional.
Before displaying the datatable there's one more step, let's go to resources/views/layouts/nav.blade.php and this code.
            <ul class="navbar-nav">
                <li class="nav-item">
                    <a href="{{ route('home') }}" class="nav-link {{ Request::routeIs('home') ? 'active' : '' }}">
                        {{ __('Home') }}
                    </a>
                </li>
                <li class="nav-item">
                    <a href="{{route('movies.index')}}" class="nav-link {{ Request::routeIs('home') ? 'active' : '' }}">
                        {{ __('Movies') }}
                    </a>
                </li>
            </ul>
In your dashboard, you should see this navbar

Everything is ready, now you have to search for resources/views/movies/index.blade.php and your datatable component like this
 <div class="card-body">
      <livewire:movie-table />
 </div>
After that, you should see your datatable.
How cool is that!!!.
8.4 Customize DataTable.
Let's make this dataTable more functional, first, we can add sorting and searching this way
 public function columns(): array
    {
        return [
            Column::make('Title')
                ->sortable()
                ->searchable(),
            Column::make('Description'),
            Column::make('Year Release', 'year_release')
                ->sortable()
                ->searchable(),
}
We can search or sort the field we want. You can try it.
But let's make this table even more complex by adding the relationship field
   public function columns(): array
    {
        return [
            Column::make('Title')
                ->sortable()
                ->searchable(),
            Column::make('Description'),
            Column::make('Year Release', 'year_release')
                ->sortable()
                ->searchable(),
            Column::make('Director', 'director.name')
                ->sortable(function (Builder $query, $direction) {
                    return $query->orderBy(Director::select('name')->whereColumn('movies.director_id', 'directors.id'), $direction);
                })
                ->searchable(),
        ];
    }
Let me explain a couple of things here.
- We can use the dot syntax to access the fields of the relationship (director.name).
- To sort the column Director we need to make a subquery in order to access the name of the director, You can check more info in the official docs of the package Laravel Livewire Tables Docs
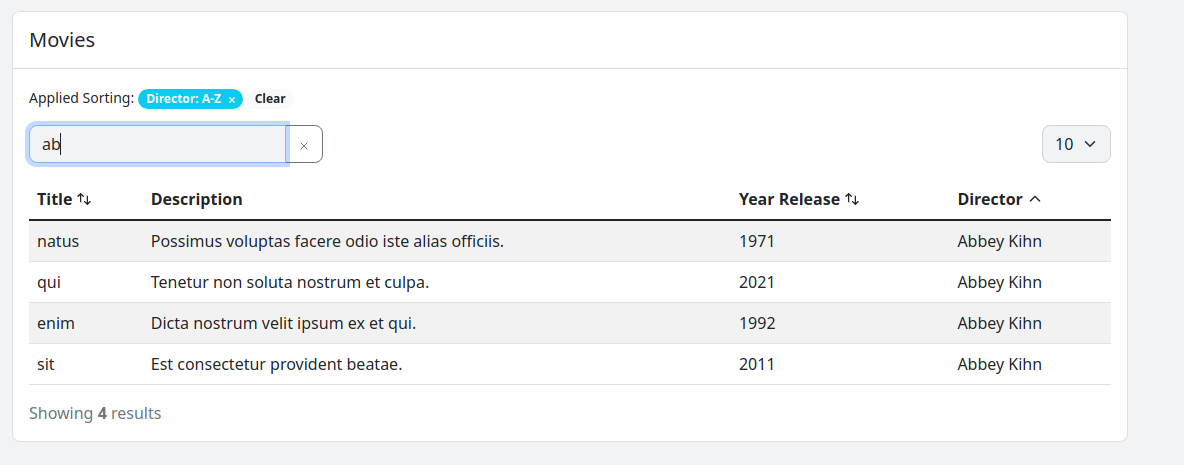
Once you complete this step you'll see this
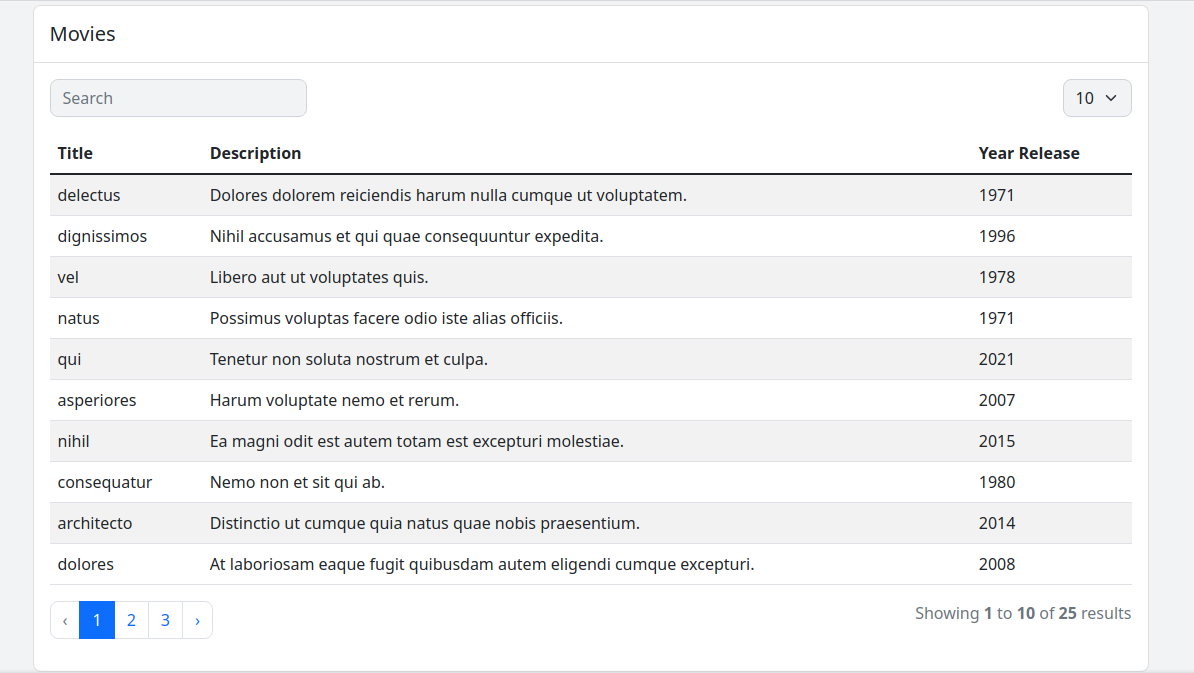
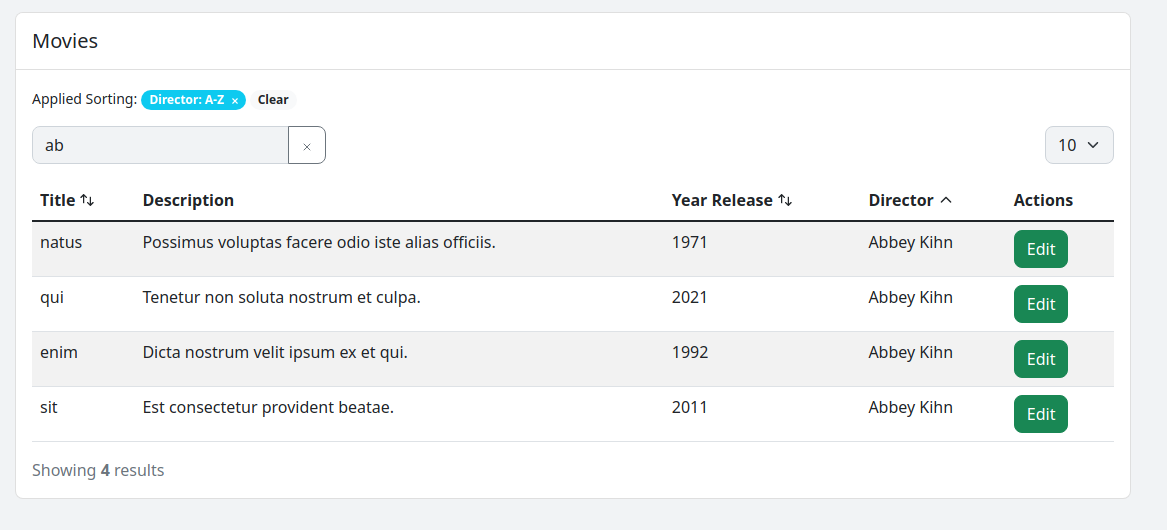
There is more thing I want to show, how we can render a view inside the datatable, remember we define a view called action.blade.php well. let's integrate that view.
    public function columns(): array
    {
        return [
            Column::make('Title')
                ->sortable()
                ->searchable(),
            Column::make('Description'),
            Column::make('Year Release', 'year_release')
                ->sortable()
                ->searchable(),
            Column::make('Director', 'director.name')
                ->sortable(function (Builder $query, $direction) {
                    return $query->orderBy(Director::select('name')->whereColumn('movies.director_id', 'directors.id'), $direction);
                })
                ->searchable(),
            Column::make('Actions')
                ->format(function ($value, $column, $row) {
                    return view('movies.action', compact('row'));
                }),
        ];
    }
To integrate that view, we need to use format function with a closure to return that view. You can read more in the official docs Laravel Livewire Offical Docs
The final view of our datatable is that.
If want to read about this awesome package, go to this site Laravel Livewire Official Docs.
Thank you so much Anthony Rappa for creating that package.
9. Github Repo.
If you have any doubt you can leave a message in the comment section or check the repo Laravel-Livewire-DataTable
Happy coding ☕. Thanks for reading 🙏.


![How To Create Admin Panel using Filament [TALL STACK]](/_next/image?url=https%3A%2F%2Fcdn.hashnode.com%2Fres%2Fhashnode%2Fimage%2Fupload%2Fv1639173022637%2F4BT9qk5g3.png&w=3840&q=75)

